
If you’re a wargamer like myself, you derive a satisfaction from knowing you’ve played your best possible game anytime you’ve set down to play a wargame. You’ve got a job and a family, so you don’t get a “kitchen pass” as often as you’d like to get away and play. The setup of a wargame is a considerable investment in time and prep, let alone the time to play it. So after all the schedule clearing and legwork to get one on the table, it is beyond anti-climactic to have a game go south on you all due to some blunder you could have foreseen with just a little bit of planning.
Good wargames not only present you variety of ways to win (or lose) a game, they also reward players for using the same sorts of thought processes actual commanders use to determine their own courses of action. Good news for us “civilians” that this process for analyzing the objectives and context is pretty straight forward and can improve your own wargaming outcomes – it’s called the Military Appreciation, and I’ll cover an example based on my own solitaire bout with a low-complexity wargame.
Any player who has sat down at their first monster wargame may have been similarly overwhelmed by the amount of information thrown at you; not unlike sitting at the controls of a 747 for the first time.

The Military Appreciation is a tool for focusing commanders on what matters in order to create, evaluate and select courses of action which are latter refined into executable plans. For wargaming, the course of action is mostly what is needed, as we don’t have the myriad logistical and other details that the staff would elaborate as part of making an actual executable plan.
The Military Appreciation can be thought of as a set of cardinal concerns which any commander must grapple with on the path to making a plan. For this exercise, I used a relatively simple wargame which could be played solo – Michael Kennedy’s We Shall Fight on the Marne published by White Dog Games copyright 2012.
The appreciation I wrote uses the seven major sections of an Attack appreciation as described in the British Junior Staff Course Guide to the Tactical Appreciation. These sections are The Aim, Limitations, Relative Strengths, Ground, Enemy Courses, Own Courses, and Selection of Course. In this scenario, I wrote an appreciation for the Allied (Franco-British) attack at the Marne on the Germans.
These sections should not be done strictly in sequence, but should be done iteratively, starting with The Aim. Since we’re doing this for playing wargames, much of this work is done by looking at the scenario description and victory conditions. As you fill the sections out, they eventually provide enough context for courses (own and enemy) as well as discriminators between the respective own courses you’ll use to evaluate your own options.
Aim
The Aim, simply stated, is the outcome you will achieve through the successful execution of your selected course of action. While the rules and scenario will describe how you get victory points, in the Aim, you get to describe exactly what subset of conditions you’ll bring about to get you enough victory points to win.
The Allied aim is to attack and secure primary objectives (Viller-Cotterets, Chalons and Reims) by the evening of 9 September. While the Allies will seize and attempt to hold the secondary objective (Chateau-Theirry), this will be a supporting effort to aid securement of Reims.
Limitations
Limitations, as you might guess, are the constraints your plans are subject to. You get these chiefly from the rules, the scenario description and based on what you judge necessary for success for your selected course of action.
- The Allies must secure the primary objectives by the evening of 9 September.
- The Allies must ensure enough forces remain to the East of Paris to prevent its investment.
Relative Strengths
Relative Strengths is a comparison of your own situation relative to the enemy summarizing everything that makes your job easier or harder based on your relative situations. This is more than a numerical correlation of forces, but should also consider initial dispositions, command and control, supply, morale and other factors which the rules and scenario description suggests.
Command and Control
The Allies enjoy both an initial (4 Command points to 2) and ongoing advantage in Command and Control. The Allied Cavalry are primarily on the front line and available for Scouting, while the German Cavalry reserve is initially in the rear in the vicinity of Ouchy-le-Chat. This will afford the Allies a crucial early advantage at the onset of the counter attack.
The imbalance in command points will make afford the Allies advantages in mobility (e.g. night movement) and flexibility.
The German 1st Army has the major weakness of having its headquarters well to the rear (north of the Ouroq) of its main strength along the Grand Morin.
Given the Selected Objectives, initial Distribution of Forces and Axes of Attack, the Battle is conceptualized as a complementary set of two battles; East and West. The Relative Strengths will be assessed in terms of these two Battles.
West Battle
In the West Battle, the Allied 6th Army faces the German 1st Army, which is divided into a weak West Flank and strong Southern contingent. The West Flank contingent includes the 1st Army HQ.
The BEF faces the German 1st Army Southern Contingent across the Grand Morin.
The German 2nd Army in included in the West Battle, as we predict it will fall back on Chateau-Theirry to dislodge the French 6th Army.
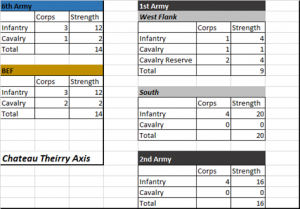
The 6th Army enjoys a margin of strength over the German 1st Army west flank enough to ensure the German contingent can be push aside in the initial drive to Villers-Cotterets. This drive will result in German 1st Army HQ fleeing even further from their Southern contingent, ensuring that that contingent stays out of command for the remainder of the battle.
While the BEF is at a strength disadvantage vis-à-vis the southern contingent, the BEF is strong enough to commit the southern contingent and prevent it from either falling back on Chateau-Theirry, or advancing on Paris.
East Battle
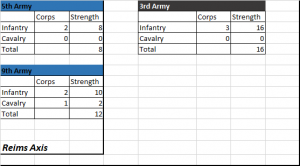
The French 9th army immediately faces the German 3rd army. While the French 9th is at an immediate disadvantage vis-à-vis the German 3rd, the Germans 3rd is deployed in a manner that allows the French 9th to concentrate overwhelming force on German XII Corp. In by attacking and dislodging (pushing it north across the Marne) XII Corp will be split up the middle on a North/South Axis, with 3rd Army HQ forced to move back out of command range of the 2 remaining corps of German 3rd Army. Subsequently, the German 3rd Army will be prevented from massing it’s full strength.
French 5th Army is sufficient for it’s initial task of securing French 9th army’s flank from the German Second Army, and combined with French 9th army will be able to overwhelm the German 3rd Army.
Ground
Ground describes the main features of the area the battle will be fought, in terms of what will help and hinder you in winning.
West Battle
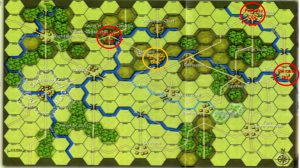
The advance on the primary objective Villers-Coterrets will proceed along the Paris-Meaux-Viller-Cotterets road. Taking this direct path will help ensure the secondary objective Chateau Theirry is taken at the earliest possible time.
The east-west Marne river can provide a defensive barrier to German forces moving against Villers-Cotterets and Chateau Theirry from the South. It can only be crossed by the bridges at Meaux and Chateau Theirry or Pontoon bridges (which the Germans will not have the Command points to make freely). It is important to secure Chateau-Theirry as early as possible.
Primary objective Villers-Cotterets has the Ourcq river before it from the East, providing a fallback defensive line for French forces falling back from the secondary objective Chateau Thierry. Villers-Cotterets also has Hills/ forests to the North/Northeast to aid in defense. This latter feature will be especially important, as we do not expect to be able to secure the bridge at Ouchy-le-Chat.
The Grand Morin is crossed by 3 bridges, 2 of which are under German control. These bridges afford the Germans multiple paths for attaching the BEF. The Allies must take or otherwise neutralize these bridges to reduce German options for crossing the Grand Morin.
East Battle
The Marne is crossed by 3 bridges north from Fere-Champoenoise to Reims; each of these bridges are under German control. The main road to Reims runs through hills and a forest which may be used by the defending Germans to slow down a French advance. Effort must be made to keep the Fere-Champenoise-Reims road as clear as possible
The gap in the hills south of Epernay and south of Sezanne are key to protecting the west flank of French 9th army. This gap is filled by the Saint-Gond Marshes, which further slow down advances by the enemy. This gap must be secured to protect the advance on Reims by French 9th Army
Enemy Courses
Enemy Courses describes the broad plans your enemy may employ to defeat you. There are many schools of thought as to how to go about determining this, but it seems safest to plan from enemy capabilities as opposed to intentions. The aim here is to cover the main option the enemy has available so that you can reasonably expect that you’ll have evaluated your own plans against the major aspects of each of their available courses. Think of the set of enemy courses of action as the “axes” which describe a space in which the actual enemy plan may have aspects of each of these courses.
In an attack appreciation, the enemy courses should actually be considered after own courses of action are laid out – your primary focus should be on what you need to make happen (offensive mindset).
We Shall Fight on the Marne comes with a solitaire engine for the Germans. This engine takes into account the current Allied situation, and returns a German approach for the turn per a die roll.
Allied Situation
A – Allied Forces are south of the Grand Morin River and hold or are adjacent to the Saint-Gond marshes; the French Sixth Army moves toward the Ourcq River.
B – Allied Forces are north of the Grand Morin and nearing the Ourcq River.
C – Allied Forces are at the Marne River and are across the Ourcq River.
| D6 (Down) | A | B | C |
| 1 | a | a | a |
| 2 | b | a | a |
| 3 | c | b | a |
| 4 | c/d | c | a |
| 5 | c/d | c/d | a |
| 6 | e | c/d | a |
German Approaches
a – German units move to defensive terrain (hills, rivers, towns, woods) and hold.
b – German Second Army moves west to attack Paris.
c – German Second (or Third) Army moves north to defend the Ourcq and conduct offensives against any French forces in that area.
d – German Third Army attacks Sezanne.
e – All German units attack south across the Grand Morin River.
While this system provides German approaches on a per-turn basis, there are some non-sensical behaviors possible since the system only selects an approach based on evaluation of the current turn. For instance, the German could end up “yo-yoing” the German 2nd army, alternating between having it advance on Paris, or falling back to the Ourcq to check French 6th army. Accordingly, I modified the solitaire system to stick to a course of action after a set of evaluations. The result is three German Courses of action (slanted, grey parallelograms). These German courses of action can be considered “terminal states” which the Germans will commit to until the end of the game.
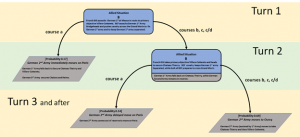
The Germans have 3 primary courses of Action, the difference between the courses being German 2nd Army’s task. In all cases:
- German 3rd has the task of defending Chalons/Reims from French 9th Army
- German 1st Army, its mobility limited by being out of command, falls back to defend the Ourcq and Marne objectives.
German Course 1: Immediate Move on Paris (Probability 0.17)
German 2nd Army crosses the Grand Morin and moves on Paris.
German Course 2: Delayed Move on Paris (Probability 0.14)
German 2nd Army spends the first and second turns in reserve, but commits to a drive on Paris on turn 3.
German Course 3: Defending north of Grand Morin
German 2nd Army moves to contest French 6th army at Chateau Thierry and Villars-Cotterets.
Own Courses
In Own Courses, you lay out possible plans in the same spirit as you did in Enemy Courses; each of the plans laid out possibly achieve success (i.e. realize the aim) in the given context described in the previous sections, but the courses as a set have the elements that will comprise the actual plan. The courses should be distinct enough so that you can be sure the actual best plan is somewhere in the space described by this set.
Three main Allied courses of actions were considered. All of the courses have these main features:
- A Decisive attack by French 6th army on the west flank of German 1st Army to seize primary objective Villers-Cotterets and to seize secondary objective Chateau Theirry. The purpose of seizing secondary objective Chateau Theirry is to drawn German 1st and 2nd armies away from Paris and in the case of German 2nd army, to keep it from interfering with the Decisive attack by French 6th
- The fixing of German 1st and 2nd Army by a combination of maneuver and assault. This will reduce German potential for either disrupting the Decisive effort on Chalons/Reims or advancing on Paris.
- A Decisive attack by French 9th Army on German 3rd Army to take primary objective Chalons and then to press on to primary objective Reims.
All Courses:
French 6th Army Assaults to dislodge to the North the right flank of German 1st army in order to take primary objective Villars-Cotterets. Upon seizing Villars-Cotterets, French 6th will seize secondary objective Chateau Theirry to afford defense in depth to primary objective Villars-Cotterets. French 6th will offer just enough resistance at Chateau Thierry to slow down German offensives towards Villars-Cotterets.
French 9th will assault German 3rd army in order to break through and seize the Fere-Champenoise – Reims road. This breakthrough will be effected in such a manner that the right and left wings of German 3rd army are kept separate, allowing French 9th army to defeat the respective portions of German 3rd Army in detail.
French 5th seizes Sezanne to fix German 2nd Army, preventing it from easily falling back on the Marne, or advancing on Paris.
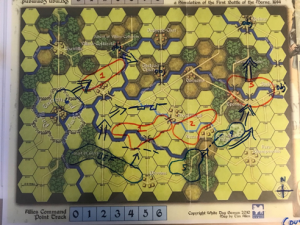
Allied Course 1: Immediate BEF Crossing of Grand Morin in Force
BEF destroys the Grand Morin bridgeheads, denying German 1st army paths to cross. BEF moves to cross the bridge to 0607 in force, allowing it to get to the rear of German 1st and support French 6th.
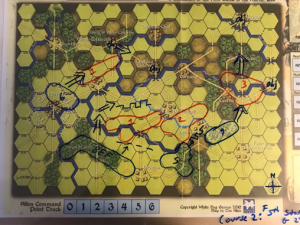
Allied Course 2: BEF Attacks!
BEF assaults the German 1st army south of the Grand Morin and secures the bridgeheads, while BEF cavalry maintains the separation between the south and west portions of German 1st army. The BEF maintains momentum northwards to further divide the south portion of German 1st army, and moves north to the Marne to support French 6th army.
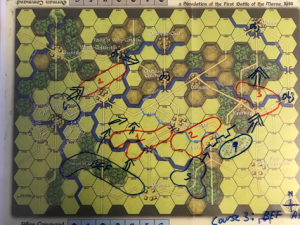
Allied Course 3: BEF in Reserve
BEF assaults the German 1st army south of the Grand Morin and secures the bridgeheads, while BEF cavalry maintains the separation between the south and west portions of German 1st army. However, the BEF remains on the south side of Grand Morin until German 2nd army commits to either moving towards the Marne or Moving on Paris. If German 2nd army moves on Paris, BEF will stop it. If German 2nd moves towards the Marne, BEF will support French 6th army by engaging German 1st from the rear to slow it down and keep it from moving on the Marne from the south.
Comparison of Courses
In the Comparison of Courses, you evaluate each of your Courses against each of the Enemy Courses, noting the strengths and weaknesses of the match ups. An NxN matrix is helpful here.
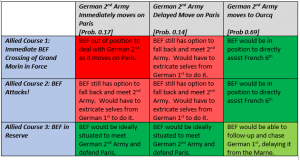
Selection of Course
Hopefully you’ll have a dominant Course which is strong against each of the identified enemy courses; this is the course you should select. The selected course may take elements of the courses not selected, so that the superior hybrid course is what is elaborated into the plan you actually play.
The Allies select Course 3: BEF in Reserve. Course 3 provides protection for Paris against German courses 1 and 2, while providing support to the decisive effort of French 6th army in the case of German course 3.
For Further Reading:
A Guide to the Tactical Appreciation, Land Warfare Centre – Junior Staff Wing. UK MOD 1988
FM 5-0 (FM 101-5) Army Planning and Orders Production, HQ Department of the Army